Manual for OpenEstate-ImmoTool
Configure ImmoTool-Server
The configuration directory of ImmoTool-Server contains several files to customize the default behaviour of the application.
Notice
In most use cases the provided default configuration is sufficient. You should only change the configuration, if it is really necessary.Configure databases
The configuration directory of ImmoTool-Server contains a file called server.properties. With this file the databases provided by ImmoTool-Server can be configured.
By default ImmoTool-Server provides exactly one database with the name "immotool". When necessary you may provide more databases with ImmoTool-Server by editing the server.properties file. You can find further information about this configuration file in the HSQLDB documentation.
For example to register a second database called "immotool2" in ImmoTool-Server, you can follow these steps:
Stop ImmoTool-Server, if it is currently running.
Open the
server.propertiesfile with a text editor and add the following lines to the end of the file:# database #1 server.database.1=file:${openestate.server.varDir}/data/immotool2/db server.dbname.1=immotool2This registers a second database called "immotool2". Its data is stored in the data directory in the
data/immotool2subfolder.Save the modified
server.propertiesfile and restart ImmoTool-Server.Start AdminTool and create a connection to the newly created database (see "Prepare ImmoTool-Server"). Enter the database name "immotool2" in the connection dialog window in order to connect to the newly created database.
After the database was prepared with AdminTool it can be accessed with ImmoTool (see "Connect to ImmoTool-Server"). Enter the database name "immotool2" in the project wizard (or login) window in order to connect to the newly created database.
In general ImmoTool-Server can provide an arbitrary number of databases in the server.properties file with freely choosable name. For each database you need to increment the counter - e.g.:
# database #0
server.database.0=file:${openestate.server.varDir}/data/immotool/db
server.dbname.0=immotool

# database #1
server.database.1=file:${openestate.server.varDir}/data/mydb/db
server.dbname.1=mydb

# database #2
server.database.2=file:${openestate.server.varDir}/data/anotherdb/db
server.dbname.2=anotherdb
Notice
The character string${openestate.server.varDir} is automatically replaced with the configured path of the data directory.Configure protocols
The configuration directory of ImmoTool-Server contains a file called logback.xml. With this file the logging behaviour of ImmoTool-Server can be configured.
By default the application stores its protocols into the protocol directory. In most cases it is not necessary to make any changes to this file. But you can find further information about customization in the documentation of Logback.
Notice
The character string${openestate.server.logDir} in the logback.xml file is automatically replaced with the configured path of the protocol directory.Notice
The character string${openestate.server.app} in the logback.xml file is automatically replaced with the name of the executing application. This allows every application to use a separate log file.Configure manager applications
ImmoTool-Server provides some helper applications to cover some administrative tasks (so called "manager applications"). These application are connecting themselves to the databases provided by the ImmoTool-Server in order to do their work (e.g. "Backup a running ImmoTool-Server").
The manager applications need to open a connection to the provided database and login with administrative permissions. Therefore it is necessary to tell these application with which credentials to login. The required login credentials have to be placed in the manager.conf file within the configuration directory.
For each database, that is provided by ImmoTool-Server, you need to add the following lines into the manager.conf file:
urlid immotool
url jdbc:hsqldb:hsql://localhost:9001/immotool
username SA
password test1234
The value after
urlidis a unique name for the database connection. To simplify matters you should use the database name here.The value after
urlis the database address used for the connection.If the manager applications are executed from the same system as the ImmoTool-Server, you can use the "localhost" address. Otherwise you should enter the IP address or hostname. If ImmoTool-Server was configured for SSL encryption, you have to use the hostname specified in the SSL certificate.
After the "localhost" (separated by a colon) address follows the configured port number. In most cases you can keep the number "9001" untouched.
After the port number "9001" (separated by a forward slash) you have to set the name of the configured database (as it is configured as
server.dbnamein theserver.propertiesfile).If the ImmoTool-Server was configured for SSL encryption, you need to replace
hsql://withhsqls://.
The value after
usernamecontains the login name of the database administrator. By default each database has an administrator account called "SA". In most cases you do not need to change this value.The value after
passwordis the password for the user specified byusername. Enter the password of the administrator here, that was chosen during the server preparation with AdminTool (see "Prepare ImmoTool-Server").
For the three example databases described in the "Configure databases" chapter, you would have to put the following lines into the manager.conf file:
urlid immotool
url jdbc:hsqldb:hsql://localhost:9001/immotool
username SA
password test1234

urlid mydb
url jdbc:hsqldb:hsql://localhost:9001/mydb
username SA
password test2345

urlid anotherdb
url jdbc:hsqldb:hsql://localhost:9001/anotherdb
username SA
password test3456
(Replace the password accordingly.)
You can find furter information about this configuration file in the HSQLDB documentation.
Warning
Themanager.conf contains sensitive information. Only the users of the operating system, who are allowed to use the manager applications, should be able to read this file.Configure SSL encryption
If ImmoTool-Server was installed outside of the local network or if connections from the internet are allowed, it is recommended to use encrypted communication between ImmoTool and ImmoTool-Server.
In other cases it also might make sense to use encryption because it improves security and integrity during data transfers. But keep in mind, that encryption will slow down the connection speed a bit and will increase the amount of computation time.
Notice
ImmoTool-Server does not allow to use encrypted and unencrypted at the same time. You need to decide which way you want to go and have to configure all ImmoTool installations in your network accordingly (see "Use SSL encryption in ImmoTool").Create SSL certificate
In order to provide SSL encryption you need to create a SSL certificate in the first step. The certificate ensures the trustworthiness of ImmoTool-Server towards the client applications.
ImmoTool-Server provides an application for easily creating a SSL certificate.
On Windows systems you can select the following start menu entry "OpenEstate-ImmoServer → Management → Create SSL certificate" to start the application.
On macOS systems you can open the application bundle "OpenEstate-ImmoServer" and start the "SslInit" application.
Alternatively you can open the
binsubfolder of the application directory. From there you can start the application viaSslInit.exe/SslInit.bat/SslInit.sh.
After the application was started a terminal window will show up with the following output:
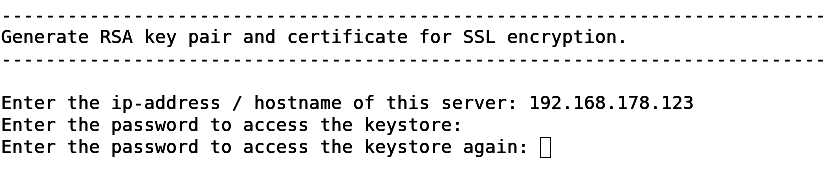
Configure the SSL certificate
Enter the IP address (or hostname), that is used for connection to the ImmoTool-Server. The SSL certificate is created exactly for this address. All applications, that are connecting to ImmoTool-Server, will have to use the provided address.
In the next step you have to enter a keystore password, that is used to protect the certificate from external modification. Note down the chosen password because it is needed afterwards.
After these settings were entered the application will create a ssl subfolder in the configuration directory. All created files are stored into this folder. The following summary is shown after the program finished its job:
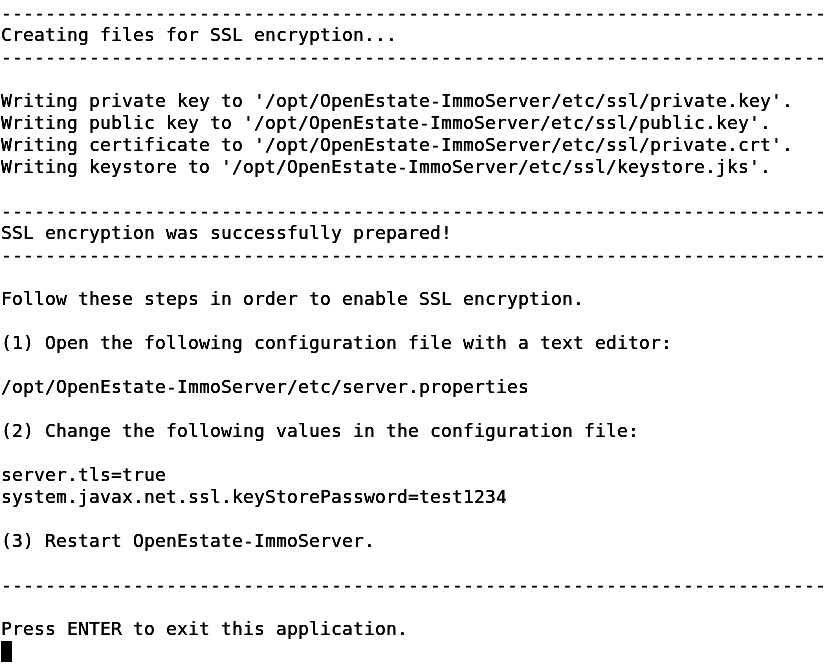
Summary about the SSL certificate
Warning
Thessl subfolder in the configuration directory contains sensitive information. Only the users of the operating system, who are allowed to start ImmoTool-Server, should be able to read this file.Notice
As an alternative to the application you can create the SSL certificate manually with the following commands:
keytool -genkey \
  -alias OpenEstate-ImmoServer \
  -keyalg RSA -validity 999 \
  -keystore keystore.jks \
  -storetype JKS

keytool -export \
  -alias OpenEstate-ImmoServer \
  -keystore keystore.jks \
  -rfc -file private.crt
The keytool application is located in the bin subfolder of the Java runtime environment.
The files created by the keytool applications have to be placed into the ssl subfolder of the configuration directory.
Enable SSL encryption
In the next step SSL encryption has to be enabled in the ImmoTool-Server. Edit the server.properties file in the configuration directory with a text editor. The following lines need to be changed:
# TLS/SSL (secure) sockets
server.tls=true
system.javax.net.ssl.keyStore=${openestate.server.etcDir}/ssl/keystore.jks
system.javax.net.ssl.keyStorePassword=test1234
The value after
server.tlshas to be set totruein order to enable SSL encryption.The value after
system.javax.net.ssl.keyStorecontains the path to the previously created keystore file (keystore.jks). In most cases you do not need to change this value.The value after
system.javax.net.ssl.keyStorePasswordis the keystore password, that was chosen during the creation of the SSL certificate.
Restart ImmoTool-Server in order to make the changes take effect.
Notice
The character string${openestate.server.etcDir} is automatically replaced with the configured path of the configuration directory.Use SSL encryption in ImmoTool
If a new remote project is created in ImmoTool, you need to select the protocol "hsqls" in the project wizard dialog.
To-Do
Add link to the project wizard in the usage section.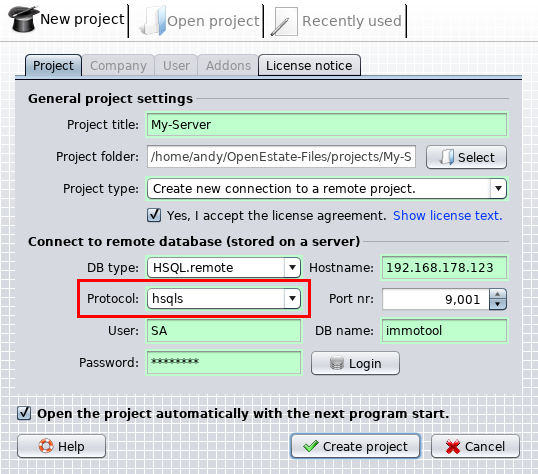
Enable SSL encryption in the project wizard
If an existing remote project is opened, you might also enable SSL encryption. Click on the "Modify server connection settings." checkbox and select the protocol "hsqls". This setting is stored permanently for the project and does not have to be set again.
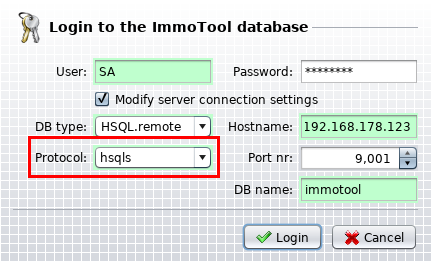
Enable SSL encryption during login
Use SSL encryption in AdminTool
If a connection is established with AdminTool, you need to select the protocol "hsqls" in the connection dialog.
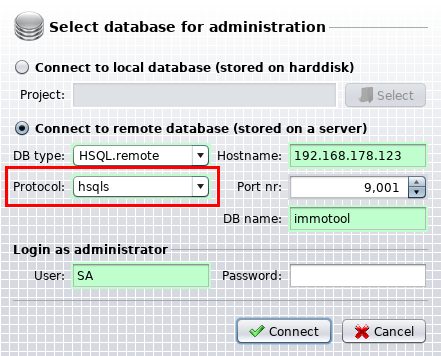
Enable SSL encryption in AdminTool
Use SSL encryption in manager applications
The manager application are configured with the manager.conf file in the configuration directory.
Modify this file with a text editor and update the value behind url for all configured databases.
- Instead of
hsql://you need to usehsqls://. - Replace
localhostwith the hostname, that was chosen while creating the SSL certificate.
The three example databases from the "Configure manager applications" chapter would have to be changed like this:
urlid immotool
url jdbc:hsqldb:hsqls://192.168.178.123:9001/immotool
username SA
password test1234

urlid mydb
url jdbc:hsqldb:hsqls://192.168.178.123:9001/mydb
username SA
password test2345

urlid anotherdb
url jdbc:hsqldb:hsqls://192.168.178.123:9001/anotherdb
username SA
password test3456