Manual for OpenEstate-ImmoTool
Updating ImmoTool-Server
ImmoTool-Server is updated much more rarely compared to ImmoTool. In contradiction to ImmoTool the ImmoTool-Server does not check for updates automatically. Therefore you should visit the OpenEstate website regularly or subscribe to the RSS feed in order to get notifications about updates.
Download the installation package for your operating system and start the installation process (see "Installing ImmoTool-Server"). Thereby keep the following notices for your operating system in mind.
Warning
Always close the ImmoTool-Server application before starting the update process.Tip
In order to avoid a data loss in case of an error, it is recommended to backup the data directory before starting the update procedure.Update on Windows
The EXE installer automatically detects, where the application was installed beforehand and will update the files accordingly.
Warning
If you made custom modifications to the configuration directory, you should backup all files in this directory before installing the update. Afterwards you can copy the modified files back.Update on macOS
Move the application symbol of "OpenEstate-ImmoServer" to the same location, where ImmoTool-Server was installed beforehand. The operating system will show the following question:
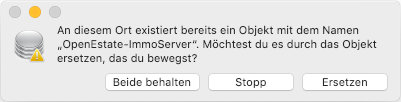
Question about overwriting on macOS
To-Do
Provide an English screenshot.Answer this question in the dialog window by clicking on "Replace".
Update on Debian, Ubuntu or similar
If the Debian repository was configured in your operating system (see "Obtain packages from the Debian repository"), you do not have to download the updated version from the OpenEstate website. Instead you can execute the following commands:
sudo apt update
sudo apt install openestate-immoserver
If you do not use the Debian repository but installed the program from the Debian package, you can download the DEB installation package. Install the downloaded package with a double click or via the following command:
sudo dpkg -i openestate-immoserver_x.y.z_amd64.deb
(Replace x.y.z with the version number of the downloaded file.)
Warning
If you made custom modifications to the configuration directory, you should backup all files in this directory before installing the update. Afterwards you can copy the modified files back.Update on Linux
- Find out the path, where ImmoTool-Server was installed beforehand.
- Download the TAR.GZ installation package for your Linux system and extract the file on your computer.
- Rename the folder, you have determined in step 1 - e.g.
OpenEstate-ImmoServer-OLD. - Create a new / empty folder with the name, you have determined in step 1 - e.g.
OpenEstate-ImmoServer. - Copy the files, that were extracted in step 2 into the newly created / empty folder.
After you have been able to properly start the application in the updated version you might remove the temporary folder created in step 3.
Warning
If you made custom modifications to the configuration directory, you should backup all files in this directory before installing the update. Afterwards you can copy the modified files back.Important advices for certain versions
This section contains advices about updates to certain application versions.
Update from version 1.0-beta to 1.x
ImmoTool-Server 1.0.0 introduced some major changes, that should be considered during an update from version 1.0-beta.
New directories
In contrast to the 1.0-beta version ImmoTool-Server does not save the databases in the application directory anymore. Before the old application directory is removed, you absolutely should backup the contents of the var/data subfolder from the old application directory.
After the new version of ImmoTool-Server was installed, start the application for the first time and shutdown the application afterwards immediately. This will create the new data directory. Open this directory and copy the previously saved contents of the var/data subfolder into the newly created data subfolder of the data directory.
You should find an already existing data subfolder. Remove or rename this folder before copying files into it.
Future updates of ImmoTool-Server 1.x do not require these steps and should work flawlessly.
New mechanism for services
Installation of services have been completely reworked with ImmoTool-Server 1.0.0. If you are using a service for the previous version, you should remove the service from the operating system before starting the update. In order to remove the service execute the ServiceUninstall.bat or ServiceUninstall.sh script in the bin directory of the old ImmoTool-Server installation.
After the new version of ImmoTool-Server was installed you can reinstall its service (see "Setup a service for ImmoTool-Server").
Future updates of ImmoTool-Server 1.x do not require these steps and should work flawlessly.
New installation routine for Windows & macOS
A new installation routine was implemented for Windows and macOS systems (EXE and DMG installation packages). The new installation packages are not compatible with the old update procedure. Please make sure, that you do not overwrite the previous ImmoTool-Server version while installing the update. Therefore we are recommending the following approach:
Find out, in which folder ImmoTool-Server 1.0-beta is currently installed on your hard drive.
If the application is located on Windows systems at
C:\Programme\OpenEstate-ImmoServer, you should rename this folder - e.g. inC:\Programme\OpenEstate-ImmoServer-OLD.On macOS systems there should not be a problem with the naming of the folder. But nevertheless you should figure out, where the application is located.
On Windows you should remove of the application (from the Desktop or start menu). On macOS you might remove the application from the Dock.
Start the installation procedure (see "Installing ImmoTool-Server").
If the application was successfully updated and the database was copied (see "New directories"), you can remove the installation folder of ImmoTool-Server 1.0-beta.
Future updates of ImmoTool-Server 1.x do not require these steps and should work flawlessly.
Java can be removed
Since version 1.0.0 Java is bundled together with the ImmoTool-Server application. Therefore you can remove Java from your operating system as long as you do not need it for other applications.
On Windows you can open the system control panel and open the section for software removal. You should find an entry for "Oracle Java", that can be removed.
On macOS you can follow these steps in order to remove "Oracle Java":
- Click on the "Finder" icon located in your dock.
- Click on "Go" in the Finder menu.
- Click on "Utilities".
- Double-click on the "Terminal" icon.
In the Terminal window copy and paste the commands below:
sudo rm -fr /Library/Internet\ Plug-Ins/JavaAppletPlugin.plugin
sudo rm -fr /Library/PreferencePanes/JavaControlPanel.prefPane
sudo rm -fr ~/Library/Application\ Support/Oracle/Java
(quoted from the official instructions by Oracle)
On Linux you might remove "OpenJDK" via the package system of your distribution. Or if "Oracle Java" was installed, you might remove its installation folder manually.