Manual for OpenEstate-ImmoTool
Installing ImmoTool-Server
The ImmoTool-Server is required, if multiple employees need to work on the same database from their workplace (see "Installing on a multiple workplaces").
Notice
If you do not want to use ImmoTool in a network with multiple employees, you do not need to install ImmoTool-Server. Instead you can install ImmoTool as a single-user installation (see "Installing on a single workplace").Install the application
Download the ImmoTool-Server installation package for your operating system (see "Download the applications").
Installation on Windows
On Windows systems you should download the EXE installation file. On a 64bit Windows system you should use the corresponding 64bit installer.
Start the downloaded EXE installer with a double click. Afterwards an installation program shows up, that will guide you through the installation process.
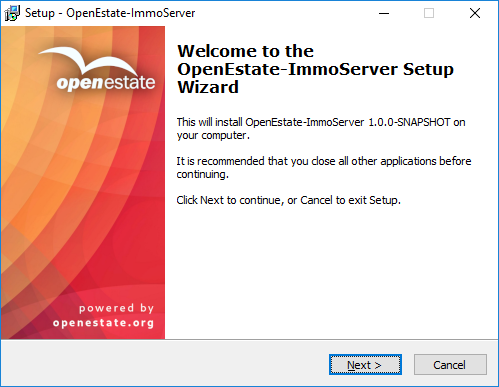
Installing ImmoTool-Server on Windows
Installation on macOS
On macOS systems you should download the DMG installation file. Start the downloaded file with a double click in order to show the following installation dialog:
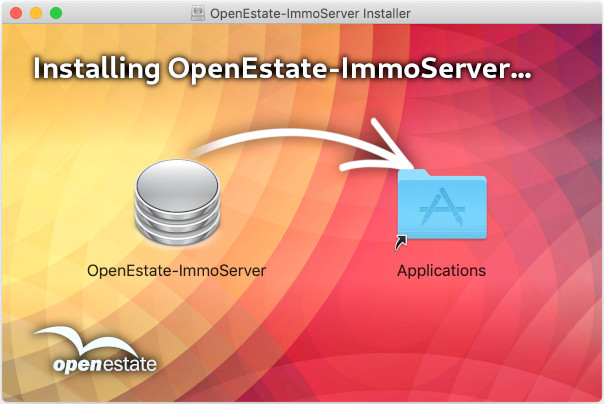
Installing ImmoTool-Server on macOS
Click with your mouse on the application symbol of "OpenEstate-ImmoServer" and drag it into the "Applications" folder. This will copy the application into your Applications folder. In future you can find the application in your Finder by opening the Applications folder.
Alternatively you can drop the application symbol somewhere else - e.g. on your desktop or any other location on your hard drive.
Installation on Debian, Ubuntu or similar
For Debian based Linux distributions (e.g. Debian, Ubuntu or Linux Mint) there are different Debian packages it is recommended to use the Debian repository (see "Obtain packages from the Debian repository"). After the repository was registered in the operating system you may install the Debian package with the following commands:
Update the package index via:
sudo apt updateInstall ImmoTool-Server:
sudo apt install openestate-immoserver
In case you do not like or want to use the repository, you may alternatively download the Debian package (resp. the DEB installation file). Install the package with a double click or via the following command:
sudo dpkg -i openestate-immoserver_x.y.z_amd64.deb
(Replace x.y.z with the version number of the downloaded file.)
Notice
The Debian package installs the application into the/opt/OpenEstate-ImmoServer directory.Notice
The Debian package automatically installs a service in the operating system. The ImmoTool-Server will start automatically as soon as the computer is booted (see "Setup a service for ImmoTool-Server").
Also the Debian package automatically installs a timer for daily backups. In order to make backups work properly, you have to set some configurations (see "Backup a running ImmoTool-Server").
Installation on Linux
If you do not use a Debian based Linux distribution or do not want to use the repository, you may alternatively download the TAR.GZ installation file. Make sure to select the correct installation file for your processor architecture (most commonly used is x86-64).
After the file was extracted on your computer you should find a directory called OpenEstate-ImmoServer. Move this directory to your preferred location on your hard drive (e.g. into the home directory or to /opt/OpenEstate-ImmoServer).
Starting ImmoTool-Server
For the first installation it is recommended to start ImmoTool-Server manually.
If the application was properly configured an all workplaces can successfully connect to the ImmoTool-Server, you should consider installing a service for ImmoTool-Server. This allows the application to start automatically while the computer is booting (see "Setup a service for ImmoTool-Server").
Notice
In order to make ImmoTool-Server available over the network you might have to open port 9001 in the firewall for incoming connections.Start ImmoTool-Server on Windows
The Windows installer created a folder called "OpenEstate-ImmoServer" in the start menu, that contains the shortcuts of the application. Click on the shortcut "Start ImmoServer manually" in the start menu in order to start ImmoTool-Server in foreground.
Besides this you may start the application manually by executing the Start.exe (or Start.bat) file in the bin subfolder of the application directory.
Start ImmoTool-Server on macOS
Open the application bundle called "OpenEstate-ImmoServer" with a double click. This will open a Finder window with the applications provided by ImmoTool-Server.
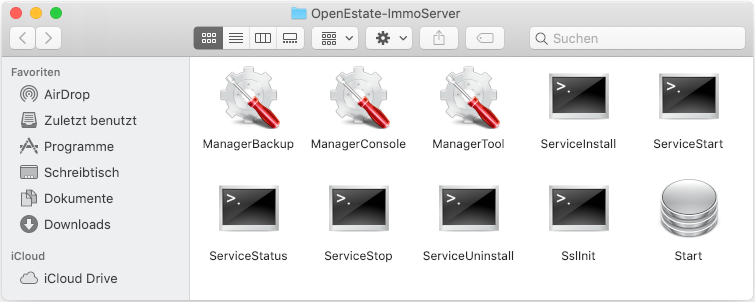
Finder window with ImmoTool-Server applications
To-Do
Provide an English screenshot.A double click on the "Start" application will start ImmoTool-Server manually.
Start ImmoTool-Server on Linux
If ImmoTool-Server was installed with the Debian package, there is already a service available and ImmoTool-Server was already started. In this case you do not have to do any further steps.
On all Linux systems you can start ImmoTool-Server manually by executing the Start.sh script in the bin subfolder of the application directory.
Prepare ImmoTool-Server
Before employees can access ImmoTool-Server with ImmoTool you have to install a database. Start AdminTool in order to perform the necessary preparations. This application is installed together with the ImmoTool application.
Install ImmoTool on the server computer or any other machine in your network (see "Installing ImmoTool") and start the AdminTool application (see "AdminTool starten").
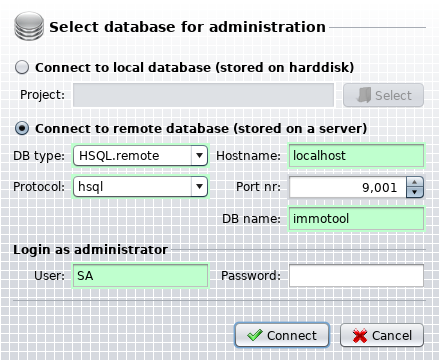
Connect to ImmoTool-Server with AdminTool
Select the option "Connect to remote database (stored on a server)" in the connection dialog. Afterwards you need to enter the connection settings for ImmoTool-Server:
DB type:
Select the option "HSQL.remote".Protocol:
In normal case you should select the option "hsql". If the ImmoTool-Server was configured for SSL encryption, you have to select the option "hsqls" (see "Configure SSL encryption").Hostname:
Enter the IP address or hostname of the computer, on which ImmoTool-Server was installed. In case AdminTool was started from the same computer you can keep the hostname "localhost" untouched.Port nr:
By default the port number is "9001". Only if ImmoTool-Server was configured for another port number, this value has to be changed.DB name:
By default the name of the database is "immotool". Only if another database with another name was configured in ImmoTool-Server, this value has to be changed.User:
The login name of the database administrator is "SA". In most cases this value has not to be changed.Password:
If a first connection to the ImmoTool-Server is established, this value can stay empty. After a password was set for the database administrator it has to be entered here.
Click on the button "Connect" in order to open a first connection from AdminTool to the ImmoTool-Server.
In the first step the application will detect, that no password was set for the database administrator ("SA"). It will ask you for a password. Please take a note of your selected password!

Enter an administration password in AdminTool
Afterwards the application will detect, that the database is not installed yet on the ImmoTool-Server. You may disable certain addons. After clicking the button "Submit" the application will initialize the database.
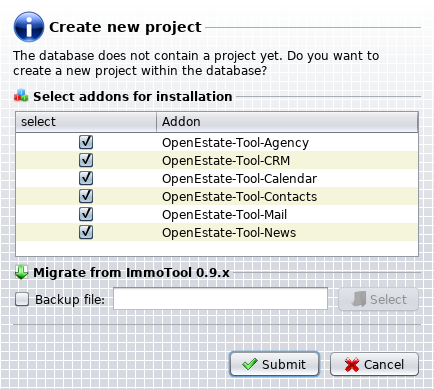
Install database on ImmoTool-Server
After these steps have been finished you may add further user accounts in the database (see "Manage user accounts").
After you have finished the configuration you may close AdminTool. From now on employees may access the database via ImmoTool.
Connect to ImmoTool-Server
After the ImmoTool-Server was successfully prepared (see "Prepare ImmoTool-Server") you may access the database via ImmoTool.
Install ImmoTool on each workplace (see "Installing ImmoTool"). After ImmoTool was started for the first time (see "Starting ImmoTool") you have to create a remote project. Open the project wizard (if it does not start automatically click on "Main Menu → Project → new project").
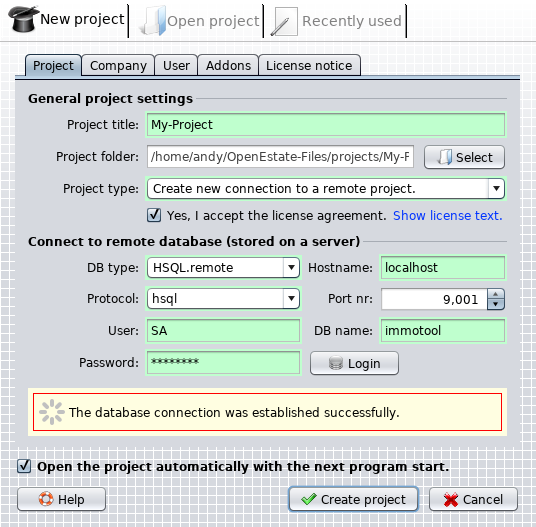
Create a remote project in project wizard
Enter the following settings into the project wizard in order to create a remote project:
Project title:
Enter any desired name for the project.Projekt type:
Select the option "Create new connection to a remote project.".DB type:
Select the option "HSQL.remote".Protocol:
In normal case you should select the option "hsql". If the ImmoTool-Server was configured for SSL encryption, you have to select the option "hsqls" (see "Configure SSL encryption").Hostname:
Enter the IP address or hostname of the computer, on which ImmoTool-Server was installed. In case ImmoTool was started from the same computer you can keep the hostname "localhost" untouched.Port nr:
By default the port number is "9001". Only if ImmoTool-Server was configured for another port number, this value has to be changed.DB name:
By default the name of the database is "immotool". Only if another database with another name was configured in ImmoTool-Server, this value has to be changed.User:
Enter the name of the database user. If other users were created via AdminTool, you may enter its login name here. Otherwise you can use the default administrator account "SA".Password:
Enter the password of the user provided in the "User" field.
Before the project is created, you have to verify the connection settings by clicking the "Login" button. If no errors were detected, you can create the project by clicking the "Create project" button. The remote project will be created and automatically opened afterwards.
On future application startups you can open the previously created remote project. The user has to enter his login name and password before database access is granted.
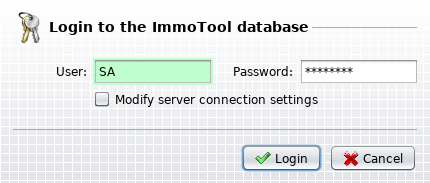
Login to a remote project